First, as most Keenovo 3D printer heater pads come with 3M PSA, we suggest following your "User's Manual--Keenovo Flexible Heater" for a general guide on installation with factory applied adhesive backing. It best to leave the glue to dry and settle for 24 hours.
TABLE OF CONTENTS
Then, a proven great setup goes like this "sandwich clamp"(from bottom to top):
Aluminum Plate/Thermal Insulation/Keenovo Heater Pad(adhered to)/Aluminum Plate/Borosilicate Glass
- The suggested thermal insulation material is silicone sponge sheet of 5mm thick, however, we were told that customers also get good results using cork sheet as the insulation.
- Clamps/chips should be applied to the "sandwich" to have them tightly clamped. The heater pad handles even pressure very well. So, theorectially, the tighter the better, so far as its heating performance is concerned. There is no need to use extra glues between the other layers.
- It's strongly suggested to make notches on the thermal insulation sheet,especially when it's hard such as a cork sheet, for the power wire bulge and the therimstor bulge so pressure is applied to heater pad surface evenly.
- If your build plate moves while printing, please secure the cables to avoid wire breaking from frequent flexing or friction.
- Last but not least, proper grounding of the aluminum plate with which the AC heater pad is in direct contact is strongly suggested.
Install Video Guide:
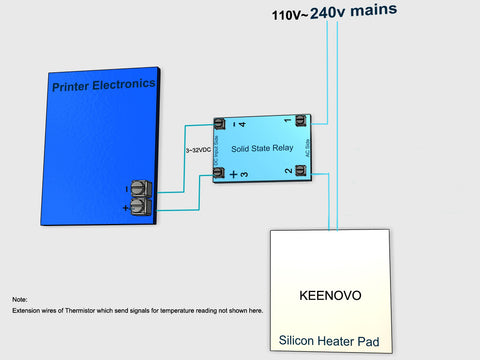
SSR Wiring Example
Disclaimer: This post is for reference only. An electrician license is required to install any AC power electronic. Please first read the post and decide whether to follow this. Make sure you are licensed electrician, as we hold no responsibility for any warranty/damage when installed by unlicensed electrician/personal.
This is another frequently asked questions " How do I wire my Keenovo heater pad to my 3D printer via an SSR?" and in some cases, we were astonished to find customers following wrong guides on this task. Thus, we feel the necessity to compose this post.
Here is how the wiring should be done correctly as shown in the diagram below:

Important Notes:
- Check if your Keenovo heater pad rating is compatible with your mains. If you are using a 110V/120V Keenovo heater pad, please connect it to 110V/120V. If it's 220V/230V/240V, please plug it to 220V ~240V. 110V pads work well at 120V, same as 220V pads at 240V. However, never use 110V/120V pads at 240V. No polarity between the two power wires( commonly in silicone and white fiberglass sleeve insulation).
- Thermistor extension wires ( commonly 22AWG in red) are not shown in the above diagram. Please simply connect the extension wires to the correct terminals on the mainboard for accepting temperature signal from the heater pad. (Corresponding terminals to read temperatures from the thermistor sensor.) Also, no polarity between the two sensor wires.
- A thermal fuse should be installed on the silicons heater pad.
- The SSR should be DA by type meaning DC input to control AC output. (There is also DD or AA SSR which will not work in this task). If possible, please choose an SSR with big copacity like this one: Omron SSR.
- Polarity MATTERS at the DC input side of the SSR as well as with the terminals for sending signals from the mainboard to control the SSR. You may need to find some extra wires for this purpose, technically any common wire gauge shall work.
- It may help to understand the working of the wiring by considering the output side of the SSR as an on/off switch and the input side of the SSR as the trigger for it to be on or off.
- Last but not least, proper grounding of the aluminum plate with which the heater pad is in direct contact is strongly suggested.
Was this article helpful?
That’s Great!
Thank you for your feedback
Sorry! We couldn't be helpful
Thank you for your feedback
Feedback sent
We appreciate your effort and will try to fix the article